Looking to get more space and use out of the space you already have. Completing one of these fold away tool storage projects for your new or existing work bench could be the ticket you need. We have broken down 7, yes 7, of some of the best flip-top and fold-away videos to make your next build a much easier process. Let us know in the comments who other videos you would add to this list.
How to Make Fold Away Tool Storage | I Like To Make Stuff
Tools Used In This Fold Away Video:
- Hinges https://amzn.to/2vFPOGB
- Kreg Jig https://amzn.to/39JdzvQ
- Self-Centering Drill Bits https://amzn.to/2SRsHRd
Fold Away Tool Storage Video Summary:
Do you have existing work benches? Do you want to get more use out of those benches and make it easier to use your bigger tools on those benches? Then this tutorial is for you. If you had told me to do this video on my own, it would have come out pretty poor without the double hinge addition. Bob has fantastic and simple tips to install these projects easily and make using these tools really easy. I think this project is definitely on my to-do list for the future. Check out Bob’s full post on this video here.
Video Breakdown:
(0:13) – Explanation of this project and what he wants to accomplish;
(1:39) – Planning to mount the pocket-hole jig, added structure to the table;
(2:27) – Hinge explanation, welding and attachment to the jig;
(4:11) – Attaching the jig to the wood support flip structure;
(4:40) – Finished flip top pocket hole demonstration;
(4:50) – He now will do the same process for his other tools, leather sowing machine;
(6:29) – Pivot point locking mechanism to keep the hanging jig from leaning outside of the table;
(7:25) – Tool #3, scroll saw;
(8:27) – Tool #4, vice clamp;
(11:15) – Wrap up.
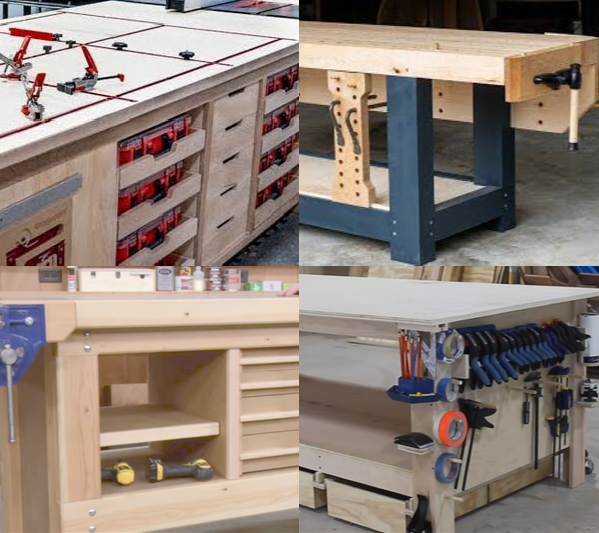
Flip Top Tool Stand with NEW Features | DIY Shop Storage | Fix This Build That
Tools Used In This Fold Away Video:
- Drawer Slides https://amzn.to/2VfYeiy
- Parallel Clamps https://amzn.to/2vVIF4W
- 5 Star Knobs https://amzn.to/37Jig7K
- Locking Casters https://amzn.to/3bZtxUU
- Folding Work Stand https://amzn.to/2SQEJeO
- 13″ Planer – https://amzn.to/2wErrcO
- Kreg Foreman https://amzn.to/39UX3Jp
Fold Away Tool Storage Video Summary:
Once again, Brad does a great job of breaking down what could be a difficult project for some, and he makes it look easy. If a stand-alone flip top rolling cart is what you are looking for this video is a fantastic must-watch. Get Brad’s plans for this project here: https://fixthisbuildthat.com/fliptopp…
Video Breakdown:
(0:12) – Layout and ripping of support and side pieces;
(0:33) – Layout and drilling of metal tube rotation hole in the side pieces;
(1:40) – Slots in side structure for the locking hardware;
(2:07) – Lower drawer/shelf and side support pocket holes and assembly;
(4:02) – Draw slide and drawer installation;
(5:23) – Caster installation;
(5:39) – I-bolt locking slots mounted at the ends of the front and back braces of the flip-top;
(6:55) – Flip-top structure assembly for incorporating the steel tube and mounting ends;
(8:17) – Drilling the through-bolt holes for the i-bolts;
(8:48) – Sanding, router-ing the edges, and polyurethane;
(9:06) – Locking hardware installation, top attachment, tube installation, and tube end supports;
(10:31) – Locking hardware adjustments for ease of use;
(11:19) – Planar mounting and attaching magnets to keep the locking bolts out of the flipping way.
Unique Clips:
(0:55) – Brad graciously shows us what not to do when drilling (ie don’t double stack the sides); I always appreciate these types of tips, as learning from other’s mistakes is a great way to learn how to complete a job the right way;
(3:26) – Brad goes over a common question about the stability of this flip top, which he says, with addition of the shelf and drawer, is quite stable, despite its height;
(4:10) – Brad packs this video full of tips for cabinet face set backs, using scraps to lift up the drawer when installing, and hotel key cards for face reveal spacing.
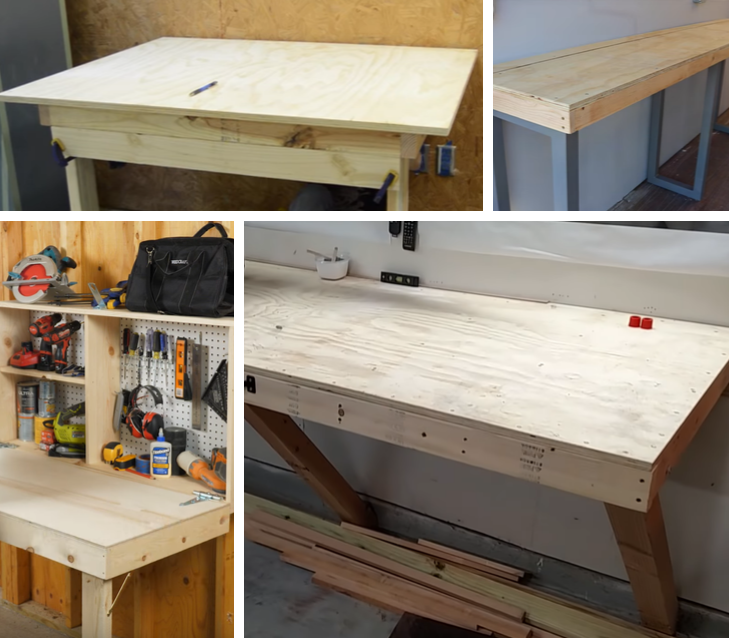
DIY Folding Mobile Workbench | Pneumatic Addict
Tools Used In This Fold Away Video:
- Hinges https://amzn.to/2Vg3SRB
- Sash Lock https://amzn.to/2SPn7zV
- 3″ Casters https://amzn.to/2HKPGrQ
Fold Away Tool Storage Video Summary:
This video was a little difficult to watch because of the editing. If it were me, I would have edited out more of the longer sections, or sped up the video in more spots. But if you can ignore that aspect, PA does a great job of describing and showing each step necessary to build this project. Check our her plans for this build here: https://gumroad.com/l/folding-workench-plans.
Video Breakdown:
(0:00) – Overview of the project;
(1:00) – Cutting 2×4’s;
(1:28) – Pre-drilling and assembly ;
(2:23) – Top and bottom plate attachment;
(3:11) – Attaching support arms;
(3:49) – Plywood support arm;
(4:43) – Joining the end pieces together;
(5:45) – Sash-lock installation;
(6:21) – Worktop support and installation;
(7:00) – Removable dowel installation;
(8:00) – Caster attachment;
(9:00) – Bench unfolding and set-up demonstration
Unique Clips:
(3:49) – She reviews great ways to rip plywood when you don’t have a large table for support.
Fold Down Miter Saw Cover To Complete Bench Top – All-In-One Woodworking Table Miter Saw Station | Woodshop Junkies
Tools Used In This Fold Away Video:
- Hinges: https://amzn.to/2v7VUzw
- Latches: https://amzn.to/37JPeF2
Fold Away Video Summary:
I included this video in the post because of the support structure and bush housing used for the support of the pivot table he installs. It seems like his work is flawless and he takes the time to explain his thought process and how he will go about the build. You might have to focus on this one to understand his accent, but its a great video overall.
Fold Away Video Breakdown:
(0:00) – Explanation of the project and what he wants to accomplish;
(1:24) – Bracing under the workbench top, cutting the hole, trimming flush with the router, and adding a chamfer;
(2:42) – Ripping panels and constructing the structure of the rotating base;
(3:54) – Discussion of pivot table design and how he thinks about constructing it to achieve his goals
(5:06) – Pivot table structure construction;
(6:55) – Discussion and installation of the pivot table in the work bench, including a sliding support to anchor it to the work bench;
(11:17) – Supporting and locking mechanisms to hold the pivot-table in place during use;
(12:16) – Planer installation on pivot table;
(13:44) – Attaching the bottom side of the pivot table, swinging door, work bench trim, and support for the pivot table;
(16:16) – Demonstration of pivot table and planer.
Unique Clips:
(13:44) – I really like how he explained how and why he changed the supports for the pivot tables mid-build for simplicity.
Installing The Ultimate Garage Workshop Storage Solution | Woodshop Junkies
Tools Used In This Fold Away Video:
- Piano Hinge: https://amzn.to/2VeemRK
- Gate Latch: https://amzn.to/2PiFDi1
- Washers: https://amzn.to/2T9dxqy
Fold Away Video Summary:
This is a great video if you have ceiling space you would like to use more efficiently. Ideally, it would be great to have easily accessible support beams, but you could get around that with more ceiling mounting. He does a great job of explaining this build and the details necessary to assemble it correctly.
Fold Away Video Breakdown:
(0:00) – Explanation of the folding shelf project and what he wants to accomplish and ripping of panels;
(1:11) – Cutting and assembly of wall mounting bracket for the shelves;
(2:59) – Explanation of structure and thicknesses he chose;
(3:28) – Mounting the support bracket to the wall and ceiling supports;
(6:18) – Assembly of the bins and attaching the bins to the back board;
(6:46) – Sanding, installing hinges, drilling hols for the pivot points;
(7:52) – Bin arrangement explanation, attachment of back board to wall bracket, and bins to back board;
(10:37) – Explanation and assembly of pivot points on each bin and to the support pieces;
(14:34) – Trim pieces, a brace system with bolt latches for the ceiling support, and a gate latch for soft open;
(17:40) – Explanation of ceiling bracing system and latches;
(18:33) – Gas springs or pulley system design thoughts which should be added;
(19:00) – Demonstration of the complete folding bins.
Unique Clips:
(4:39) – I like his design for the wood at the back of each bin which is slightly offset to hide, and allow for the thickness of, the piano hinge;
(10:37) – He came up with an ingenious design to attach the bins to the pivot support while minimizing wear over time.
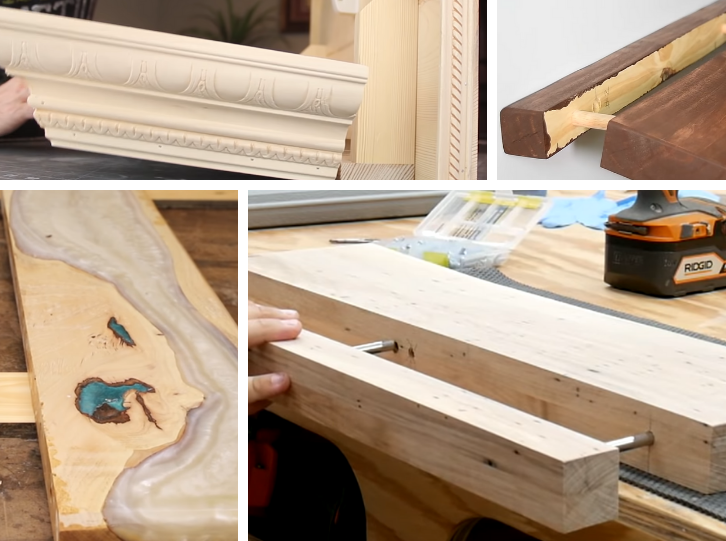
Double Ended Flip-Top Workbench | Woodworking Build | Pneumatic Addict
Tools Used In This Fold Away Video:
- Ridgid Planer: https://amzn.to/2xhsDTD
- Framing Nailer: https://amzn.to/3atH9pM
- Kreg Foreman: https://amzn.to/2VVD9tV
- Carriage Bolts: https://amzn.to/2PXRFhf
Fold Away Video Summary:
I included this video to show an easy to build option for a dual sided flip-top work bench. I think I would either use a metal rod instead of the wood dowel for support, or add another layer of protection or slippery surface to the dowel so that it doesn’t break down over time. Check out her full post about this video on her website here.
Fold Away Video Breakdown:
(0:37) – Design for her double ended flip-top work bench;
(1:01) – Cutting and assembly of the legs and supports;
(2:05) – Connecting the two sides of the frame with stretchers;
(2:49) – Adding the casters to the bottom of the work bench;
(3:09) – Drilling holes for, assembly of the flip-top work surfaces with the support dowels, and attaching them to the frame with extra support;
(6:17) – Adding carriage bolts to lock in the flip-top surfaces for use and attaching the tools to the work bench;
(7:30) – Testing the finished work bench.
Fold up work bench – Craig English
Tools Used In This Fold Away Video:
Video Summary:
We previously reviewed this video in our Folding Work Bench post which can be found here
Video Breakdown:
(0:45) – Casters;
(1:04) – Carriage bolt leg attachment and assembly;
(1:30) – Work bench support layout;
(2:02) – Stretcher layout and assembly;
(2:32) – Folding down the bench and table top explanation;
(3:08) – Wall connections and coat hooks for emergency stop ;
(3:48) – Latch system;
(4:06) – Process for folding up the work bench.